System Operation
Starting Maestro
- Click the
TFMSbutton on the vatSys menu bar - Select an airport from the menu
If the TFMS menu item does not appear, refer to the installation instructions.
Window Layout
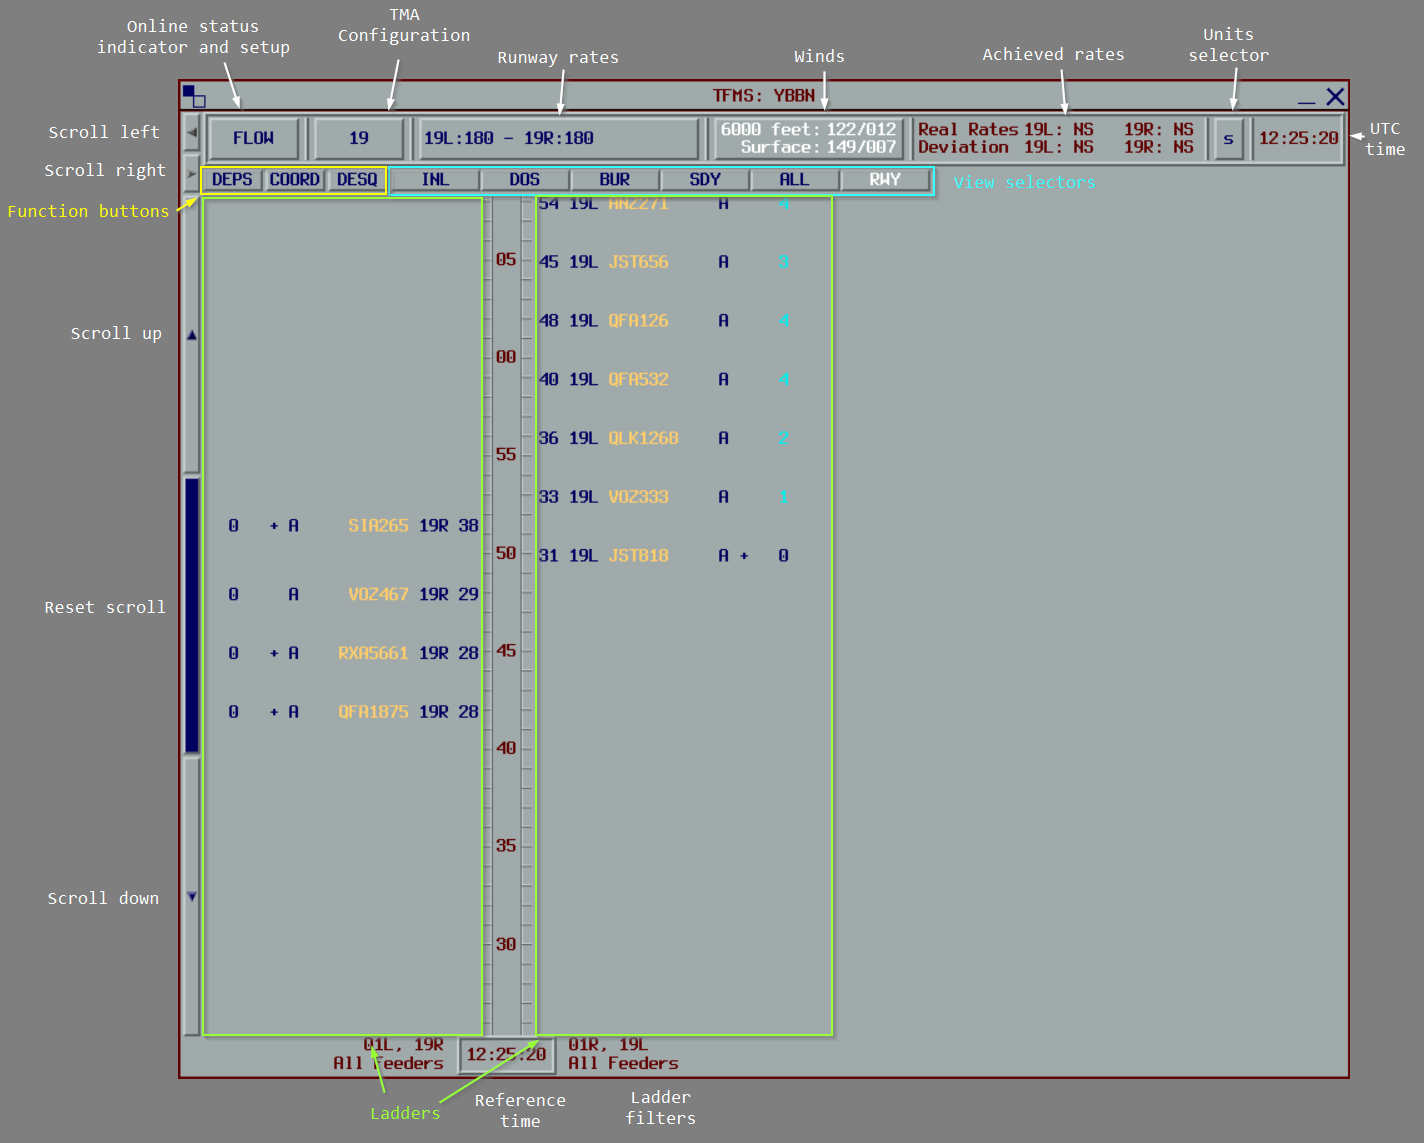
The upper section displays the connection status, TMA configuration, runway acceptance rates, upper and lower winds, achieved rates, units, and UTC time.
The lower section contains function buttons, view selector buttons, and sequence ladders.
Function Buttons
| Button | Purpose |
|---|---|
DEPS | Open the pending departures list |
COORD | Open the coordination window |
DESQ | Open the desequenced flights list (turns white when flights exist) |
Views
The view buttons switch between different displays of the sequence.
Each view defines one or more ladders filtered by runway or feeder fix, a time reference (STA or STA_FF), and a label layout.
Views using STA are called Runway views. Views using STA_FF are called Feeder views.
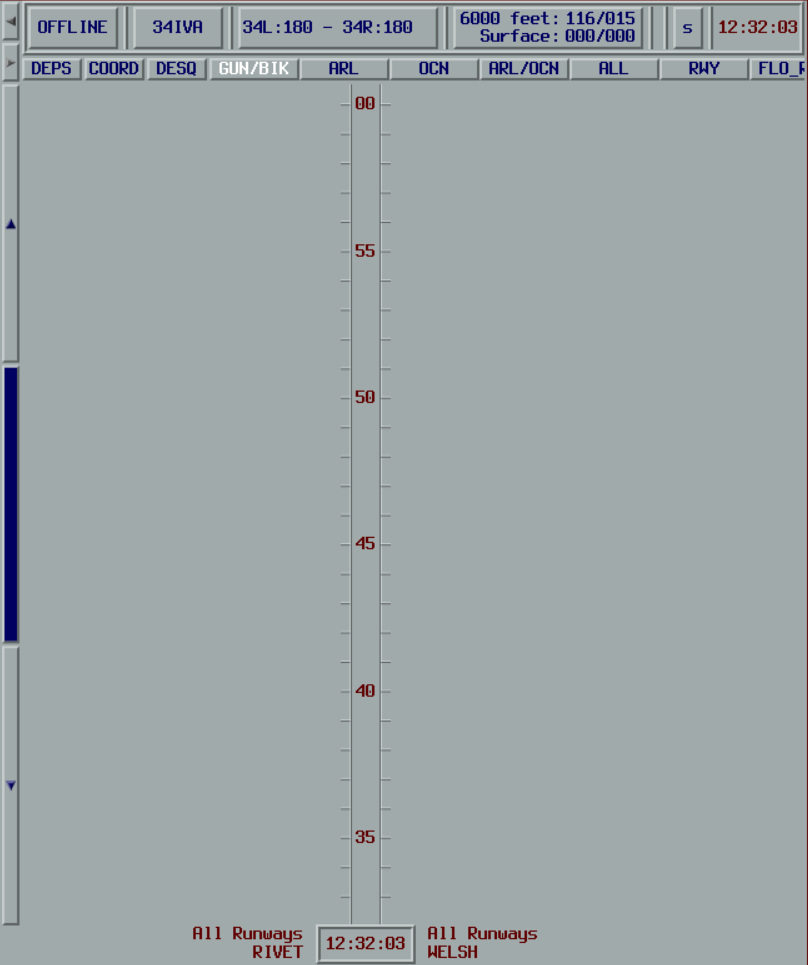
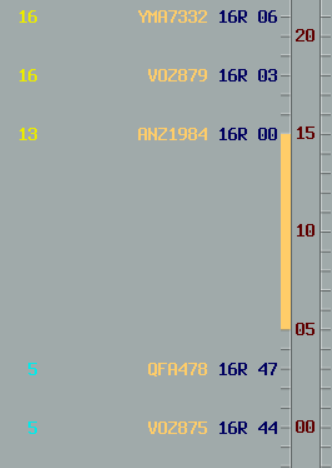
Ladders
Ladders are vertical timelines displaying flights in the sequence. Each tick represents one minute. Flights are positioned based on the view's time reference.
Buttons to the left of the ladders control scrolling:
- Up/Down Arrows - Scroll 15 minutes
- Center Button - Reset to current time
When scrolled, the time reference at the bottom turns blue. When more than two ladders are present, additional buttons become available for horizontal scrolling.
Flight Labels
Flight labels are mirrored on each side of the ladder.

Labels may include:
- Aircraft callsign
- Aircraft type code
- Wake turbulence category
- Assigned runway
- Assigned approach type
- Landing Time (STA)
- Feeder Fix Time (STA_FF)
- Total delay assigned
- Remaining delay to be absorbed
- Manual Delay Indicator
- High Speed Indicator (displayed when no delay is required)
- Coupling Status Indicator (displayed when flight plan is not yet linked to a radar track)
The colour of each label item can change based on a configurable colour source:
- Assigned runway
- Assigned approach type
- Feeder Fix
- State
- Runway Mode
- Controller Action
See Plugin Configuration for configuration details.
Right-click a flight label to access actions like changing runway, adjusting delay, or removing the flight. See Flight Management for details on each action.
Connection Status
The Connection Status button (top-left) displays the current connection status.
| Status | Meaning |
|---|---|
OFFLINE | Not connected to a server. All processing is local and all functions are available. |
READY | Connected to the server but not synchronised. Appears when connected before joining the VATSIM network. |
FLOW | Connected with the Flow role. This client is the Master. |
ENR | Connected with the Enroute role. A Flow controller is online. Some functions may be restricted. |
APP | Connected with the Approach role. A Flow controller is online. Some functions may be restricted. |
ENR/FLOW | Connected with the Enroute role. No Flow controller is online. All functions are available. |
APP/FLOW | Connected with the Approach role. No Flow controller is online. All functions are available. |
OBS | Connected with the Observer role. The sequence is read-only. |
Click the button to open the connection settings and start or stop the connection to the vMaestro server.
TMA Configuration
The TMA Configuration button displays the current runway mode.
![]()
When a configuration change is scheduled for the future, the button text turns white and shows:
[Current Configuration] → [New Configuration] at [Change Time]
![]()
Changing the Configuration
Click the TMA Configuration button to open the TMA Configuration window.
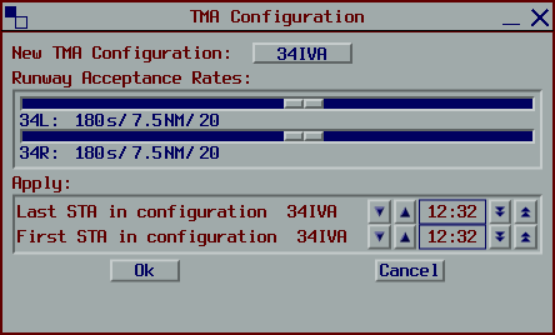
From this window you can:
- Select a predefined runway mode
- Adjust acceptance rates for each runway using the sliders
- Schedule when the configuration change takes effect
Scheduling Configuration Changes
The validity period is controlled by two times:
- Last STA in configuration - The last landing time using the current configuration
- First STA in configuration - The first landing time using the new configuration
Use the arrow buttons to adjust these times:
- Single arrows change by 1 minute
- Double arrows change by 5 minutes
Flights scheduled to land after the "First STA in configuration" time will be processed using the new configuration.
When a gap exists between the two times, no flights may land during that period. Any flight with an estimate within this gap will be delayed until after the new configuration begins.
Runway Acceptance Rates
The Runway Acceptance Rates button displays each active runway with its current acceptance rate.
![]()
The acceptance rate is the minimum time separation between successive landings on that runway.
When a rate change is scheduled for the future, the button text turns white.
![]()
Changing the Landing Rates
Changing the landing rates adjusts the acceptance rates of the current runway mode without changing the runway mode itself. Use this when the configuration stays the same but the throughput needs to change.
Click the Runway Acceptance Rates button to open the Landing Rates window.
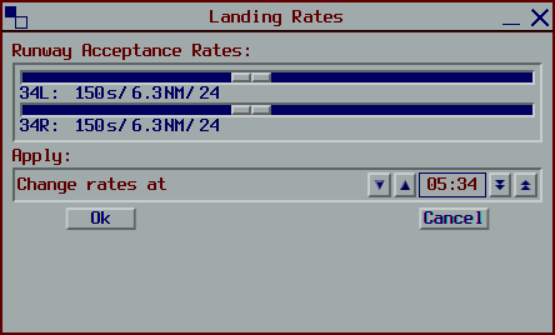
From this window you can:
- Adjust the acceptance rate for each runway using the sliders
- Schedule when the rate change takes effect
Unlike a TMA configuration change, a rate change takes effect at a single change time with no gap. Flights scheduled to land at or after the change time are separated using the new rates. Earlier flights are unaffected.
Landing rate changes and TMA configuration changes are mutually exclusive. Only one can be pending at a time. Scheduling one while the other is pending replaces it.
To cancel a pending rate change, reopen the window and cancel the change. The rates revert to the current mode's values.
Wind Configuration
The Winds button displays the current surface and upper winds.
Surface winds are sourced from METAR, while upper winds are sourced from GRIB. Winds are automatically updated every 30 minutes.
Surface winds are used to calculate the average distance between arrivals on the runway. Upper winds are used to augment TMA trajectory calculations.
When manually overridden, the button text turns white.
The Winds button is only visible to Flow and Approach controllers, and to Enroute controllers when acting as pseudo-flow (when no Flow controller is online).
Changing the Winds
Click the Winds button to open the Wind Configuration window.
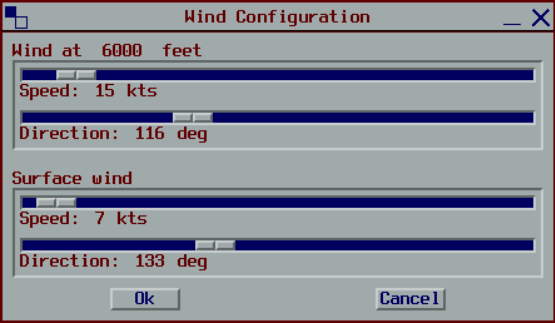
From this window you can:
- View and modify the upper wind speed and direction
- View and modify the surface wind speed and direction
Manual wind overrides will be used until the next automatic update, which will overwrite any manual changes.
Achieved Rates
The Achieved Rates section displays the actual landing rate for each active runway compared to the desired acceptance rate. The rate is shown in the currently selected unit (see Units Selector).
For each runway, the section shows:
- The achieved landing rate
- The deviation from the desired rate
If the deviation is not significant, NS (Not Significant) is displayed.
When a numeric deviation is shown:
- Positive numbers indicate the runway is handling more landings than desired (higher throughput)
- Negative numbers indicate the runway is handling fewer landings than desired (lower throughput)
The Achieved Rates section is only visible to Flow and Approach controllers, and to Enroute controllers when acting as pseudo-flow (when no Flow controller is online).
Units Selector
The Units Selector button cycles through different units for displaying landing rates. Click the button to switch between available units:
S: Seconds between arrivalsNM: Distance between arrivals in nautical milesAc: Aircraft per hour
The selected unit affects how runway acceptance rates and achieved rates are displayed throughout the interface.
The Units Selector is only visible to Flow and Approach controllers, and to Enroute controllers when acting as pseudo-flow (when no Flow controller is online).
Flight Management
Inserting Flights
Departures
Departure flights can be manually activated early from the pending list, allowing any required delay to be absorbed on the ground before departure.
- Click the
DEPSbutton - Select the flight from the Pending list
- Set the expected take-off time
- Click
OK

The landing estimate is calculated from the take-off time plus a predefined flight time. The coupling status indicator may appear until the flight departs and couples to a radar track.

If Maestro calculates delay before departure, this can be absorbed on the ground.
Overshoot Flights
To resequence a flight that has conducted a missed approach:
- Right-click on another flight (or the ladder in a runway view)
- Select
Insert Flight, thenBeforeorAfter - Select the overshoot flight from the list
- Click
OK
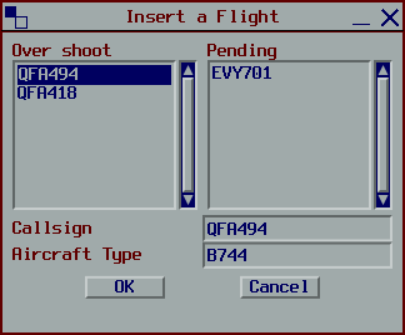
Before inserts the flight ahead of the target, delaying the target flight. After inserts behind the target without affecting it.
Flights cannot be inserted between two Frozen flights when the gap is less than twice the acceptance rate.
Dummy Flights
Dummy flights are placeholders for flights not tracked by vatSys (airwork, practice approaches, etc.).
- Right-click on another flight (or the ladder in a runway view)
- Select
Insert Flight, thenBeforeorAfter - Enter the flight details (or leave blank for an auto-generated callsign)
- Click
OK
Moving Flights
Flights can be moved within the sequence from a runway view.
- Left-click a flight label to select it (a frame appears)
- Left-click the destination position on the ladder
Alternatively, drag the flight label up or down the ladder.

To deselect without moving, left-click the flight again or right-click anywhere.
To swap two flights, select one flight then click another. The two flights exchange positions.
Flights cannot be moved between two Frozen flights when the gap is less than twice the acceptance rate.
Modifying Flights
Change Runway
- Right-click the flight
- Select
Change Runway - Select the new runway

The flight is reinserted into the sequence based on its estimate for the new runway.
Change Approach Type
- Right-click the flight
- Select
Change Approach Type - Select the approach type
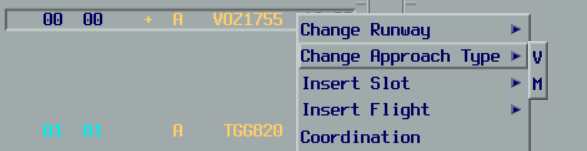
The landing estimate is recalculated. The sequence position remains unchanged.
Change ETA_FF
If the vatSys estimate is inaccurate, it can be manually overridden.
- Right-click the flight
- Select
Change ETA_FF - Set the new time
- Click
OK

The flight is reinserted based on the new estimate. Future updates from vatSys are ignored until the override is cleared.
Manual Delay
To limit the maximum delay a flight can receive:
- Right-click the flight
- Select
Manual Delay - Select the maximum delay

The flight is repositioned to not exceed the specified delay. New flights entering the sequence will not push this flight beyond its delay limit.
A delay of 00 still allows delay up to the runway's acceptance rate.
Recompute
Recomputing resets a flight to its original state, clearing any manual overrides.
- Right-click the flight
- Select
Recompute
This clears any manual delay or ETA_FF override, recalculates the estimates, and reinserts the flight as if it were new.
Removing Flights
Desequence
Desequencing temporarily removes a flight from the sequence for holding, technical issues, or other reasons. The flight can be quickly resequenced later.
- Right-click the flight
- Select
Desequence
The flight moves to the Desequenced list.
To resequence:
- Click the
DESQbutton - Select the flight
- Click
RESEQUENCE

Make Pending
For departures that have not yet taken off:
- Right-click the flight
- Select
Make Pending
The flight returns to the Pending list and can be manually activated again later.
Remove
Removing deletes a flight from the sequence (for diversions, cancellations, etc.).
- Right-click the flight
- Select
Remove - Click
Confirm
The flight is removed from the sequence. If the flight plan is still active in vatSys, it will reappear in the pending list and can be manually activated again if needed.
Viewing Flight Information
To view detailed information about a flight:
- Right-click the flight
- Click
Information
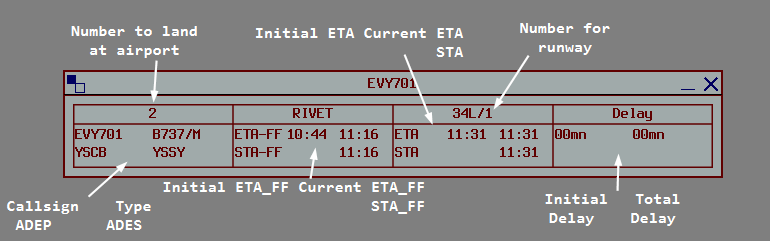
Up to 4 Information windows can be displayed simultaneously.
Slots
Slots reserve runway capacity by preventing flights from being scheduled during a specific time period. For more on how slots affect scheduling, see System Overview.
Creating a Slot
- Right-click on the ladder in a runway view
- Select
Insert Slot - Adjust the start and end times
- Click
OK

The slot appears on the ladder. Any non-frozen flights within the slot are delayed until after the slot ends.
Modifying a Slot
- Left-click the slot on the ladder
- Adjust the start and end times
- Click
OK
Removing a Slot
- Left-click the slot on the ladder
- Click
Remove
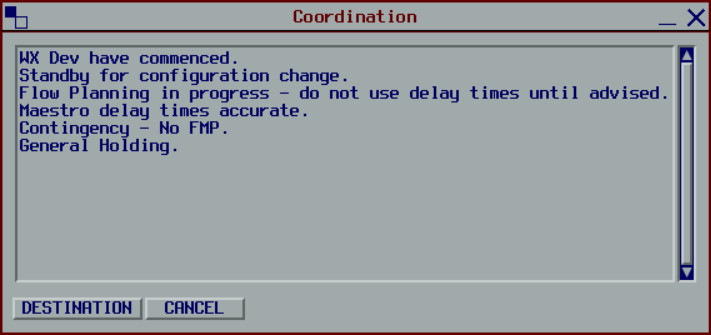
Coordination
Maestro supports sending predefined coordination messages to other controllers connected to the same server.
General Coordination
- Click the
COORDbutton - Select a message from the list
- Click
DESTINATION - Select the recipient from the dropdown
Flight Coordination
- Right-click on a flight label
- Select
Coordination - Select a message from the list
- Click
SEND

Flight coordination messages include the flight's callsign and are sent to all relevant units.
Receiving Messages
Incoming coordination messages appear in the Information window.

Click ACK to acknowledge and clear the messages.